
First let me say this is just my dimensions I used to obtain the size topper I wanted. There are patterns out there for tree skirts and I just thought I could scale things down and make this one bigger or this one smaller to get the size I wanted.
This is the topper I will share with you today. It measures 30" in diameter.

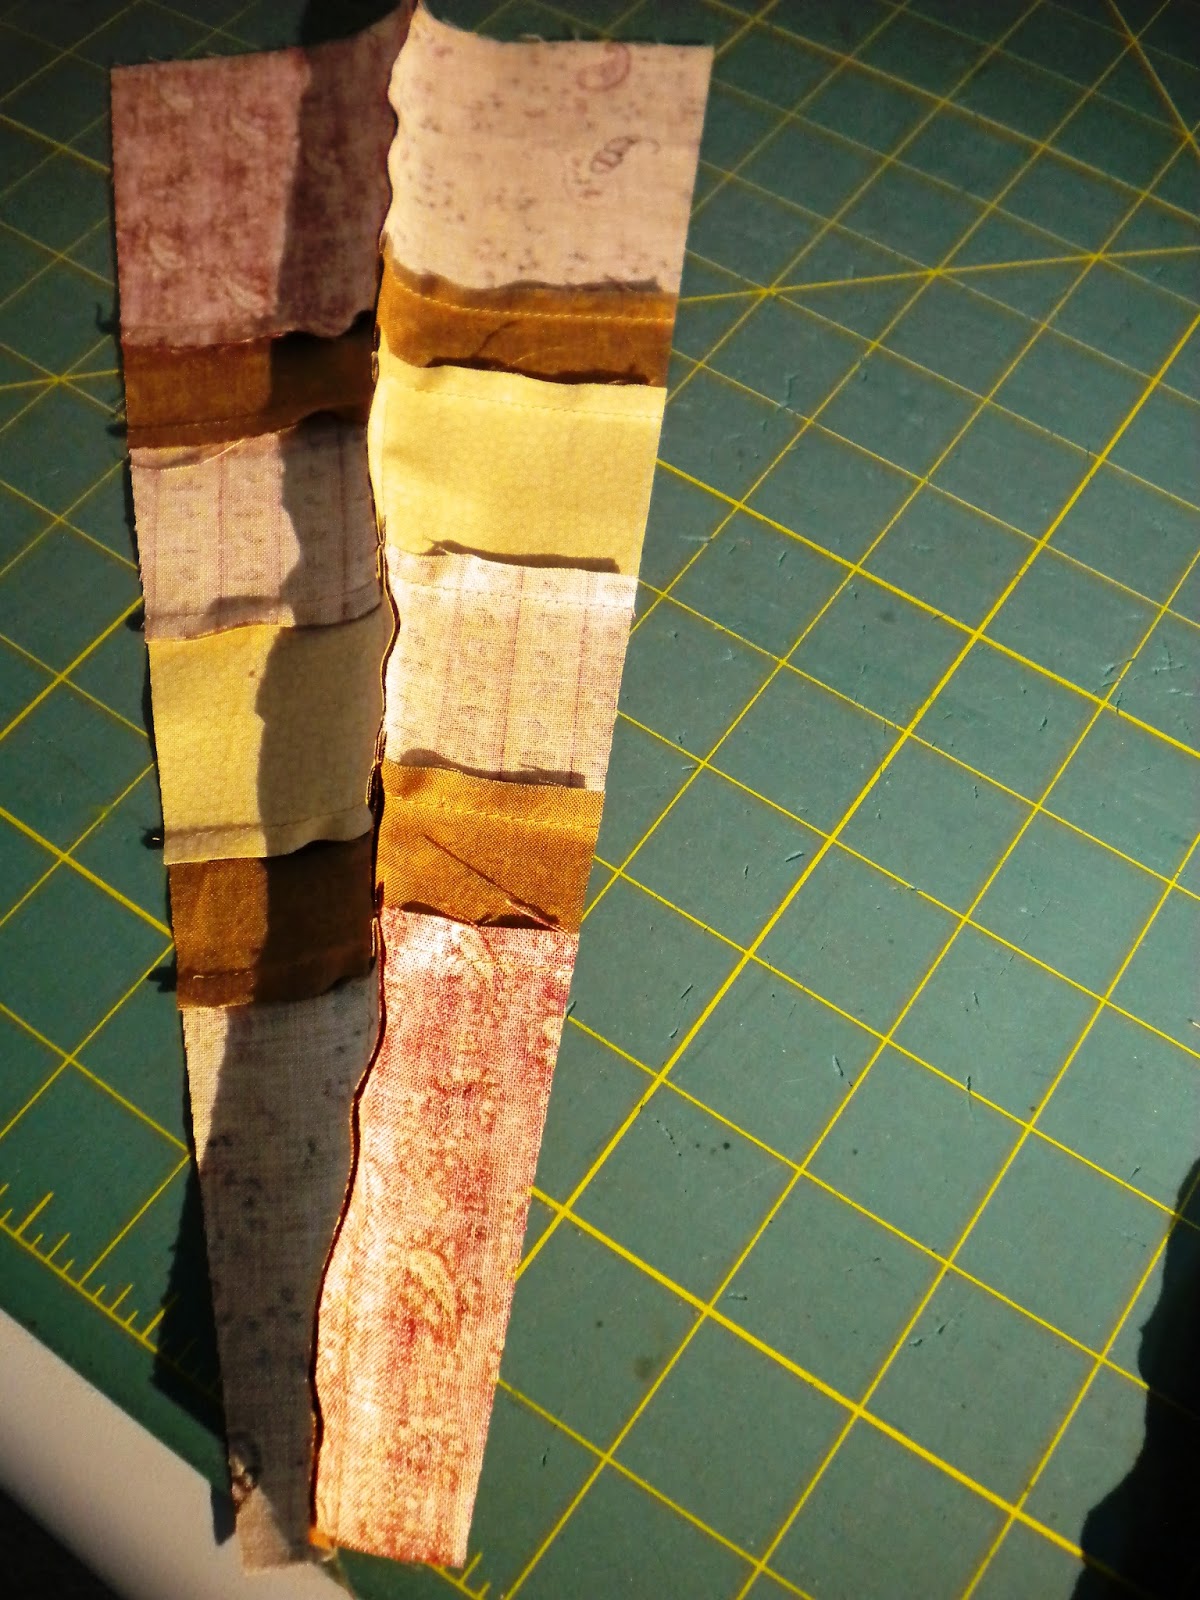
You have to make 2 strip sets-in the picture below you see how wide I cut mine, this is the width of fabric(WOF). Cut 2 of everything except the brown 1.5" ones you will need 4.

Sew your strips together staggering them by 1/4". If you don't do this it's ok, you will still have enough fabric :-)
This is how your strip set will look sewn together. It should measure 12.5". I like to use a scant 1/4" seam to make the strip set.

Now you are ready to cut your wedges. Both strip sets will be cut the same so lay them the same way, but only cut one set at a time for accuracy. Please IGNORE my green tape on the wedge ruler (it's for another project). Using Cheryl Phillips 10 degree wedge ruler you will cut 18 pairs of wedges for a total of 36 to make a complete circle.
 Place your wedge ruler on the fabric with the small end toward you. Cut on both sides of the ruler.
Now turn the ruler around so the wide end is toward you and from now on you will only need to cut on the one side of the ruler. Notice how you have 2 different wedges now(this is a pair). Continue cutting and turning the ruler using both strip sets until you have 18 of each

Here are 2 pair

Now take the stacks of 18 in each and sew into pairs. I like to press once I have them all together in a circle.

Notice how the seams nest together. Once you have the pairs sewn, then sew 2 pr. together and keep going until you have attached all 36 wedges and sew the first wedge to the last wedge to complete your circle.
I like to press now from the back first using a dry iron. Gently moving my iron around in the circle pressing them all the same way. Be careful as this is pretty stretchy, reminds me of an accordion! Once they are all pressed I give it a little steam and go around again carefully. Then turn it over and steam the front, making sure you don't have any pleats in any of the seams.

Ooops I got distracted for a second watching Bambi saunter through our back yard.

Ok back to our topper, here is what it should look like now, yep a big hole in the center is just what you want. Measure that hole and add at least an inch, more is better in this case.


I cut a 6.5" circle of fabric and one of light weight fusible interfacing using my Olfa circle cutter.


Center it over the hole and place an applique sheet under it so you don't fuse the circle to your ironing surface. Fuse in place and applique your favorite way.
And your topper is ready to quilt and bind. Be sure to use a bias binding and remember don't stretch the binding while applying it to the front, after all that work you want your topper to lay nice and flat!
Oh wait I didn't mean work-it's fun right!! Go ahead and get creative in your fabric selection and be sure to let me know if you make one. AND if anyone has a question just let me know! Hope you enjoy the tutorial.

Great tutorial....thanks!
ReplyDeleteThank you, Vicki! This is awesome!!
ReplyDeleteWow! Just perfect! :-)
ReplyDeleteVicki......awesome tute!!!!! I so love your fabric choices! I've seen these done before but yours has "clicked" with me!!!!!! I'm off to check out my ruler stash.....or, maybe the Quilt Cupboard on Thursday!!!!! Hugs....................
ReplyDeleteSuper tute Vicki!!! Thanks!!!
ReplyDeleteSo nice and clear. Thanks! I even have a 10* wedge ruler. Will definitely put this on my bucket list.
ReplyDeleteThanks Vicki, that was a great tutorial. Now, can you also do a tutorial on how to create more time so I can actually make some of the projects I have in mind?
ReplyDeleteWonderful tutorial. You make it so easy to follow. I may have to try this one day. Love your fabric choices.
ReplyDeleteThank you, Vicki, this is a great tutorial! And I can start one right now because I have the ruler which has just been collecting dust all this time. Oh, and of course, I have a ROOM full of great fabric. . .
ReplyDeleteGreat tutorial!!! I really like the fabrics you have chosen. Thank you so much for sharing.
ReplyDeleteThat is gorgeous!!!
ReplyDeleteWhoa - that is so much easier to make than one would think! Cool, way cool. Thanks for sharing.
ReplyDeleteSo gorgeous! And it looks so simple. Thanks for sharing!
ReplyDeleteYay! Thanks so much for the great tutorial Vicki! I will have to dig out that wedge ruler I bought in oh, 2000! love your Bambi--kinda miss seeing them, kinda don't (garden/bird feeder thiefs!) from when we lived in the countryside in Alberta.
ReplyDeleteThank you for this great tutorial I look forward to having a go now I have your helpful tutorial to guide me.
ReplyDeleteThank you for the tutorial...will have to bookmark this. Liked the way you did the circle with the fusible interfacing...brilliant!
ReplyDeleteGreat tutorial, thank you! :) The trick with the centre circle is very handy.
ReplyDeleteGreat tutorial and the topper is just beautiful.Thanks!
ReplyDeleteOops... I just realized I posted the comment that should be here to your tutorial instead. Sigh. Still like the Christmas topper.
ReplyDeleteI followed you here from Kathy's Quilts. This is so beautiful! I love your clear instructions and the way you made it look so easy! Thank you for sharing!
ReplyDeleteThank you so much. Uschi
ReplyDeleteThank you for this lovely topper tutorial. Didn't know it could be so easy to make and I even own a wedge ruler. Perhaps a Christmas topper for next Christmas. Getting a head start because before you know it we are back getting ready to celebrate another Christmas holiday. Just saying....
ReplyDeleteteam delivers the right solution to users around the world. We are available whenever you need any guidance. We provide 24*7 hour service. We provide you with the best service.Apple Router Customer Support
ReplyDeleteFantastic, you make it look so much easier! Thank you!!
ReplyDelete