Showing posts sorted by date for query wool pressing mat. Sort by relevance Show all posts

Monday, January 24, 2022

Pressing tip

Kathleen is hosting her Tips and Tutorials on the 22nd for the 3rd year.  We can all use new tips, right?  

My tip for you is a simple one that can be really helpful.  I like using my little Steam Fast iron for pressing seams open, especially on blocks but I have been known to use it on long rows in a table runner.  Because it is small it can get in small places without accidentally pressing other seams in a direction you don't want them to go.  


I also love that it is so lightweight it is less stress on my hands, and believe me this little iron gets hot!  Here I am pressing the beginning of a strawberry block on a wool pressing mat.  I hope this quick little tip helps you out too.

Please join me over at Kathleen's to either post your tip/tutorial or learn a new one.  Also linking with Monday Making


Thursday, February 21, 2019

A new to me product you might like

Disclaimer: I was sent these products to try out and do a review on them.

Remember a couple months ago I did a review on a wool pressing mat from Precision Quilting.  After doing that, the company asked if I would like to try out a couple more of their products and do a review.  I am always game to try something new:)

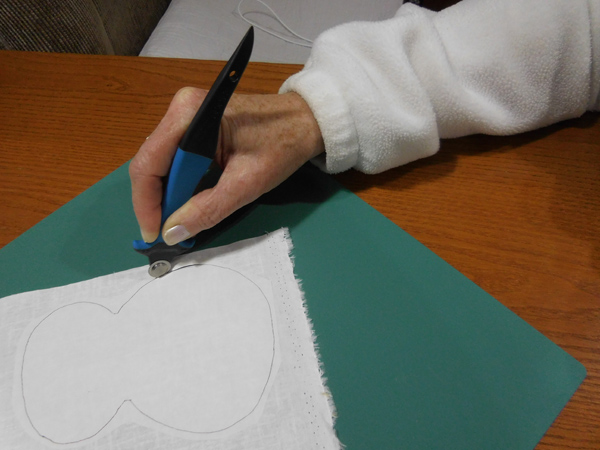
What they sent this time was a small 14mm rotary cutter great for cutting out applique's.  You really hold this one differently which I found made it easy to cut around small applique pieces to large ones.  It works for either left hand or right hand cutting!  Here I chose to hold it like a pencil. Here is a link to a video on the company's website.  It was fun to zip around my snowman applique.

The second product Jon sent was his Precision Fusing Mat.  You can check out their video on this product on the same page.  They have the mats in two sizes, 12 x 18 and 17 x 24.  In the following photos I am using the smaller size.  The mat is a special type of silicone.


You lay your pattern under the fusing mat and place your favorite fusible web on top of the mat and you can still see to draw your pattern on the fusible web. The mat has just enough weight and non slip quality that your pattern and fusible web don't slide around.


After tracing your pattern onto fusible web, apply it to your fabric and cut out your design with the precision cutter.  If you have a pattern with lots of layers you can then lay your pattern underneath the mat and layer your applique pieces on top of the mat. Lay the special Teflon coated pressing sheet(that comes with your fusing mat) over your applique pieces. 

Press them in place using the manufacturers instructions from your fusible web, you will not loose the web on the back of the appliques but they will adhere to one another. Look at my cute snowmen all stuck together and ready to fuse to my background fabric.


I used my new Janome Skyline7 to do the applique.


 All done appliquing and borders on and waiting to be quilted when I am in the mood to do that;)

Thank you Jon for sending me the Fusing mat and Precision cutter to try out!!  

Linking with Myra and Sarah


Friday, January 25, 2019

My quilt is 'getting away' with Island Batik!

Hooray today is my day on the Get Away Island Batik blog hop!  Welcome old and new friends, grab a cup off coffee and feel free to look around my blog.  The blog hop started January 7th and goes through February 2nd.  The collections we are using were released at Fall Market. You still have time to visit them all:)

Being an Island Batik Ambassador is just the most awesome job ever...oh wait it is not a job because I love it so much;)  Working with these wonderful fabrics, OMG the colors, the feel of the fabric, it's just all fantastic.


This collection is called Brookview. Doesn't it remind you of water in a stream and wildflowers growing all around? You should be able to find this collection in your stores now, if not ask for it!
 

 I used most of the 20 different fabrics, I wanted lots of color is this quilt so I stayed away from the 2-3 light colors.  It was so much fun arranging all the colors.


My 7 year old Grandson helped with the arranging and cutting my blocks apart after I chain pieced them. 

Here I am pressing my blocks using my wool mat from Precision Quilting.


 I used a Villa Rosa pattern called Tuscan Sun for piecing this lap quilt. I met the designer yesterday and shared a picture of my quilt, she is such a sweetie!  My quilt is 56" x 70". 


I had fun taking some photo's while my quilt was on it's Getaway!


Thank you to Island Batik for providing the fabric for this project. Also provided for us was Hobbs batting and Aurifil thread.  I quilted a freehand allover design of paisley swirl that Jasmine taught me.

Be sure to visit all the other Island Batik Ambassadors to get loads of wonderful inspiration. There are giveaways involved.  Be sure to check out the Island Batik blog and sign up for their fabulous give away of 20 fat quarters also.


WEEK 1
Monday, January 7 - Crystal Ball

Tuesday, January 8  - Ditty

Wednesday, January 9 - Elk Lodge

Thursday, January 10 - Feline Fine

Friday, January 11 - Flea Market

WEEK 2
Monday, January 14 - Fortune Teller
Jennifer Fulton- The Inquiring Quilter

Tuesday, January 15  - Gypsy Rose

Wednesday, January 16 - Paisley Park

Thursday, January 17 - Soul Song

Friday, January 18 - Twilight Chic

WEEK 3
Monday, January 21 - Winter Park

Tuesday, January 22  - Bazaar

Wednesday, January 23 - Blossom

Thursday, January 24 - Boho

Friday, January 25 - Brookview

WEEK 4
Monday, January 28 - French Blue

Tuesday, January 29  - Midsummer Night

Wednesday, January 30 - Oh Deer

Thursday, January 31 - Snow Berry  

Friday, February 1-  Candy Cane Lane and Icicle
Anne Wiens- Icicle - Sweetgrass Creative Designs
Barbara Gaddy - Candy Cane Lane  -Bejeweled Quilts by Barb

Linking with  Sarah and Myra


Tuesday, December 18, 2018

Wool Pressing mat-review

A few weeks ago I was given a wool pressing mat from Precision Quilting to try out and do a review on.  The first time I ever heard of and saw a wool pressing mat was last spring at the AQS Paducah quilt show.  I really didn't know what the fuss was all about and so many were buying them.  But as time passed I kept seeing and hearing all these good things.


So you can imagine how excited I was to receive this 100% wool mat from Jon at Precision Quilting. These mats are made using premium wool from New Zealand and are 1/2" thick.  I have been using it to make these crazy tree runners.  You can see there are many seams.  And look how flat my block is!

There are several good points to these mats.  One is that your fabric doesn't slide around like on a regular ironing surface.  The other they help to make your block flat.  That happens because the wool kind of reflects the heat back up toward your block so it is like it is heating both sides of the block at the same time, therefore helping it to be flatter.  But the heat does not go through the bottom of the mat, therefore you can put it on any surface.  You can even pin into the mat if you need to block a small project.

I like that the mats are totally portable.  I can't wait to try it out in the camper next year since I won't have to be careful of heat going through it while pressing my fabric/blocks.

There seem to be a few different brands on the market.  Some I hear have quite an odor at first.  This one that I was given does not.  It comes sealed in a clear plastic, when I opened it I did not smell a thing, still haven't.  I really am enjoying using it.  Thanks Jon!

Linking with Linky Tuesday Wednesday Wait Loss, Let's Bee Social, WIPand Mid Week Makers.