Showing posts with label Snowman panel. Show all posts

Friday, October 25, 2024

Flower Power and more

Doesn't the border on this quilt remind you of flower power!!  It was so fun to make from a Villa Rosa pattern called Cinnamon Stix. A very easy and fast quilt to make.  I modified it a bit to fit the amount of fabric I had.  This is more child size. I had pieced it late this summer and quilted this week.


Some pretty pink flannel piecing for the back.


A quick stipple on the long arm keeps it soft and cuddly.


Since it was a quick finish I moved on to quilt this one that has patiently waited it's turn on the long arm.  I found a free tutorial for it HERE


Another quick stipple with a monkey print flannel back. These are both donation quilts. 


Nope not done yet!  This one was in the to be quilted pile also. This was not as quick to quilt as I did lots of custom on it with rulers and freehand.


The snowman is a panel and I added the green border, along with the black snowflake print with the inserted red strip to meet the friendship stars. I had made one last year and sold it, now this one is sold already too.  It's the last panel I have of it, so time to move on to a different one;)


Through 10/29/24 Accuquilt is offering $5 flat rate ground shipping, orders $150+ ship free


Friday, August 16, 2024

Winter Wonderland

 Winter Wonderland was a very fun panel, I knew I had to have it the minute I saw it. You know what I am going to do with it don't you:0


If you said square it up and add some fun elements for the borders you would be correct!! Friendship stars were made using two dies from my 8" Accuquilt cube. 


Flying geese units for the tree, I used Fons and Porter flying geese ruler for these making them finish at 3"x6".


Here is the total finished wall hanging. It is approximately 35"x 49.5".  All photographed and listed in my Etsy shop.


I had precut everything before we went camping last week and I sewed it in the camper. Quilted and bound it yesterday. 


Accuquilt sale 8/15/24 thru 8/29/24  20% Off GO! Dies & GO! Die Bundles (Use Code: DIES20)

Linking with these Friday parties: TGIFF, Finished or Not Friday, Off the Wall Friday.  I hope you are joining in the parties!


Friday, October 27, 2023

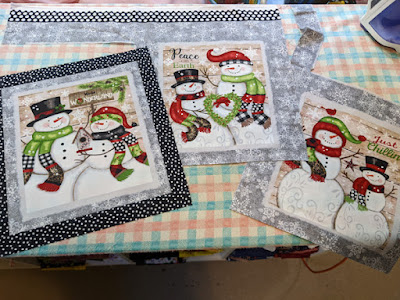
Snowman Trio

I just finished this trio of snowman wall hangings. They all started life off as part of a panel, there were six of them. What I am showing you today are the last three, the others I used last year. 


The polka dot border is where I started bringing this one to life. Followed by a teeny faux piping before the final buffalo check/snowflake border.


All ruler work for the straight line quilting.


The second one began with me adding the gingham border that finished at 1", followed by the same with a polka dot border. This one has a snowman fabric for the final border. 


The quilting is the same for these first two that have finished approximately 17.5"x 18.5".


This third one took a little longer to be born as I got stumped after the first two borders. I really wanted to bring out the green in the snowman hat and scarf. But for some reason I just couldn't find the right fabric to finish it off.  


Until I remembered I had a fat quarter of this black with snowflake. Well wait it still needed something else.  Looking around the room and through the Christmas/winter fabrics I spied the red and white stripe. This fabric has been used a lot in my snowman table runners. Yep that works. 


The trio will soon be listed in my Etsy shop, need a few more photos first.


I'll have a fun quilty purchase to show you on Monday, I hope you'll come check it out!

Linking with these fun Friday linky parties, please stop by and check out what others have been working on this week.  

Wednesday, October 13, 2021

Fancied Up Snowman Panel

 A Happy Holiday Snowman panel is just what one needs to make you smile don't you think!  It's no secret that I love snowmen and working with panels.  The center and the eight little pictures in two of the borders are from the same panel. They are so happy I just couldn't resist getting it made, not that I am in any hurry what so ever for snow.  I love the addition of the tall flying geese tree!   


And just look at what I did in the red border, stenciled snowflakes:)


And I had the perfect aqua on hand for the backing.  


While we are on the subject of snowmen, I just finished these yesterday.  Why make one when you can make two, LOL.  


Linking with:

Friday, October 9, 2020

Holiday Cheer Panel

 On Tuesday I promised you a post for this Holiday Cheer panel, my second panel I finished last week. This panel had small coordinating pictures that  I wanted included in this wall hanging. I had made up this panel before so I just went with the same layout to make things quick and easy.  The first border I added was the solid cherry red fabric, everything inside of that is the pre printed panel.  The next thing I did was find the common measurement for all the small pictures.  Once that was done I could add on some of the green polka dot fabric in 1.5" spacer to get to the measurements I wanted. After those were all attached I could add on the chunky polka dot ends to make that unit long enough to fit.  


And off to quilt it with hook swirls in the center.


Slanted lines on the small pictures.


The Polka dots received a simple stipple, while the red border wanted loops.  The wonky squares on the panel received some, well, wonky square quilting:0


You can see the quilting better on the back. 


Friday, October 2, 2020

Warm Winter Greetings

 It's not like I am ready for winter by any means, but that is the name of this panel:)  There are so many fun panels for all seasons and occasions out there.  And I might just happen to have a few, okay maybe more than a few in my stash.  I dug out the fall and winter ones last weekend and I just couldn't get inspired as to how I wanted to finish them.  I knew I had done this particular one before so I checked back at my photos.  The decision was made to make it the same but use different fabrics.  


The first thing with a panel is to square it up.  Sometimes that is easy and sometimes it is hard.  This one didn't need too much fusing with it.  The only thing I needed to do was make sure my checkerboard border would come out correctly in the red and white formation and not have two reds or two whites together. 

Picking the fabrics is fun for me.  The method I use is to look at the panel and then pull fabrics from my stash that are the same or close to the same coloration.  Then audition them for prints, like size and shape.  I tend to use a lot of tone on tone fabrics.  For this particular panel I chose a red tone on tone with polka dots and an off white for the checkerboard. 

I was thrilled to discover I could use the green plaid that I had just bought from that fabric moving sale a couple weekends ago.  It was only a half yard piece and worked perfectly.  That was for the second border I added.  The the third border was the red that was used in the checkerboard border.  In the corners I did a half square triangle in the red and green and it makes it look like a churn dash around the panel. I purposely made the green and red borders a different size for added interest. 

Of course I had fun with the quilting. Swirls on the panel make it look like wind swirling around.  The green plaid has ribbon candy, it didn't show up the best with green thread, but you can still see the texture. And the red outer border and HST corners received easy straight line quilting. 

Another piece of the moving sale fabric made it into the back.

Even though I have a ton more panels, it feels great to have used one!  Well technically I have used two, I did another panel the very next day, but my camera battery totally died and I am awaiting a new one so I can get back to photographing. 

Liking with Put Your Foot Down, and Finished or Not Friday