Showing posts with label wall hanging. Show all posts

Friday, June 5, 2026

Blue pumpkin

One blue pumpkin placemat panel turned into a wall hanging. 


Additions I made were the two gold sashing to the top and bottom of the panel itself.  From there blue and white triangles and surrounded all that with a brown. A very skinny white sashing was added before the final blue border with matching binding. 

I was amazed I had two blue prints that coordinated with the blue plaid I bought to go with the panel. 


Some might say it is too early to work on pumpkins, but hey I already had someone purchase a turkey table runner. So it seems it is never too early to work on any season if you are in the mood!


I am pretty pleased I jumped right in and used a piece of the new acquisition, that doesn't always happen.  I had the backing fabric in the stash. 


Friday's linky parties:  Finished or Not, TGIFFOff The Wall, Beauties Pageant


Friday, January 20, 2023

Luck of The Irish-Pattern launch

Today I am so excited to show you my newest pattern! It's another in the series of 'Welcome' quilted hangings that you can hang on your door or wall.  Luck of The Irish is a quick and easy make that measures 12" x 26".  You can get it made in plenty of time to display for St. Patrick's Day.  Thanks to Wendy for testing it for me, she also thought it was quick and easy to whip up.  She'll be showing hers soon on her blog Pieceful Thoughts.


Easy to make flying geese.


Quick to make checkerboards. 


One simple shamrock to applique.


Quilt it and make your favorite hanger on the back.  I like using the triangles in the corners for small pieces like this.


The perfect little piece for a small space in your home, office or to give as a gift.  You can find this PDF downloadable pattern in my Etsy Pattern shop.   Introductory offer of 25% off from Jan. 20th, 2023 through Jan. 31, 2023. You must use code- SHAMROCK23 to get the discount.     

Linking with:


Saturday, November 19, 2022

Snowman Trio

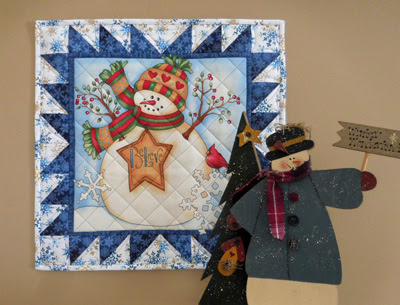
 A week ago I pieced all three of these little hangings in a full day of sewing. It was so fun I couldn't stop! This one finished at 16.5" square. The center being a panel block. 


While going through a few things in the garage DH found a six pack of empty blue beer bottles. He gave them to a friend who slumps glass. The friend gave them back to us after slumping three together making two trays.  I love them and were so perfect to use as a prop! 


After squaring up the little panel block I added the blue and white HST's for the outer border. I don't do a lot of blue items so this was fun to create.  Someone else thought it was pretty cute, it only lasted an hour in the shop!!  That just makes me giddy😄


And on to a different color. These next two were from the same panel and yet look so different because of the colors I chose for the borders. I used scraps of the blue to add a pop of color to coordinate with the panel block.


This one measures in at 13" x 17". Just right for a small nook. 


Since this one had a cardinal on the front I used cardinal fabric for the back.  For the little wall hangings I add triangle corners for the dowel rod, making it fast and easy for customers to hang it. 

And the third wall hanging measures 16" x 18.5". I added two red borders and the green/white checkerboard border made with scraps from another project. 


I used a Christmas cup as a prop to show that they could use this as a little table topper if they wanted to. 

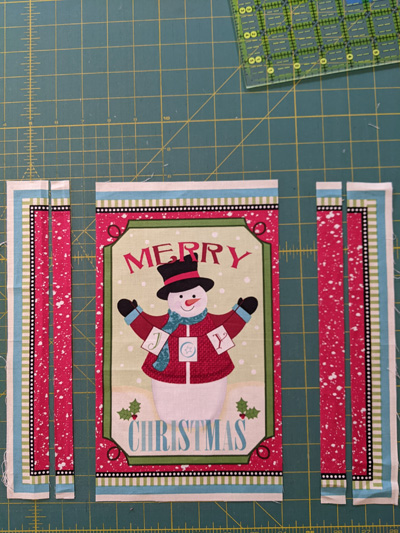
I want to share the story of this little guy. He started out looking like this... 


This is the part where I decide what size the panel block needs to be in order for the rest of my design to work with it.  I didn't particularly like that the block was square and the center framed snowman was rectangular.  So I decided to cut it

And cut it apart a second time, throw away the skinny red strip you see below.


And sew it back together to get a rectangular block! Once I pressed the seams open, finished piecing and quilting it you can't tell that there is a seam there! Well unless you were on the hunt for it that is.


So don't be afraid to play with your panels!!

Linking with Oh Scrap on Sunday.

Friday, October 15, 2021

A perfect fall scene

 Don't you think this is the perfect fall scene, pumpkins and sunflowers.  These are from two different but coordinating panels.  


Then I added some border elements to make it a unique wall hanging that measures 37" x 30".  I admit I stumbled around a bit in the designing process.  I had originally planned to add a picket fence style of border below the pumpkin scene. However, it just wasn't right so I went back to my standard pinwheels.  They just seem to look good on any panel piece.  


And to top it all off I had the perfect sunflower fabric for the outer border. 


And pumpkin fabric for the backing!  I really do enjoy making fall themed projects.  The fabrics are just so warm.  I just listed this one in my Etsy shop.  Two other fall panels sold in the last week so I thought I better get a couple more done.  I'll share the second one soon. 

There is more quilting in my schedule today so I better get to it!  But this weekend most likely no quilting. I have another craft that needs done ASAP!  I deliver to a local craft show on Wednesday and they need to be ready to go. 

Wishing you all a wonderful quilty day😃

Linking with:

Tuesday, September 26, 2017

Snowmen X 3

You may have seen these next three wall hangings before when I posted HERE.  They were only pieced at that time, now they are finished.  As usual by clicking on the pic you will get a larger one to look at more closely if you want to.

Number one:


Number two:


 Number 3:

                  
 These cute snowmen were all on the same panel and I stretched it to make three different wall hangings by adding several different elements to each one. They all measure approximately 19" x 31", Hobbs 80/20 batting and Glide thread.

Yesterday I put bindings on eight items.  So hang onto your hat there is more to come this week!

Linking with Freemotion by the RiverMidweek Makers and Let's Bee Social


Saturday, July 8, 2017

Pumpkin wall hanging

This is made from a pattern I picked up at the Minnesota Quilt show in Duluth in June.  The pattern is from Cottage Rose.   For the background, I chose a marbled black/grey . The pumpkins are from scraps of several different oranges.  This was so fun to make and lots of fun to quilt;)


I used an army green Glide thread on the black/gray, it does not show as green at all but adds just a little extra to the stitching.  I love the texture!  Also used Glide orange on pumpkins and orange border.


 After it was pieced I was wishing I had used a lighter/brighter green for the stem as it didn't show up well.  A friend of mine suggested using a brighter green and doing tendrils, that was just what it needed.  Thanks Rett!!


The perfect gray and black backing was just waiting in my stash;)


And because so many of you have been enjoying my flower pix, here is my Clematis.  


Hope you all have another great summer weekend planned!

Linking with several of the parties on my left side bar in the coming days.

Wednesday, September 14, 2016

Falling for purses

I had a past customer of my purses come to see what I had on hand a couple weeks ago as she needed a new one. The ones I had made were not going to work for her, so we looked through my fabric and she picked out the perfect ones for her:-)  Since I like to make them in batches, and since I needed more for an upcoming craft, show I decided a couple days later to go through my bin of purse fabrics and get started.  These are what I came up with.  My customer ordered the one on the bottom right.

They all have 8 pockets inside, 3 pockets outside and a magnetic closure. This is from a pattern I made, I have had many requests for the pattern, but at this time I do not have it for sale. However the purses are for sale;-)

My customer also brought along a friend of hers(mine too) and she really like this snowman wall hanging I was working on and it is now hers!  Customers sister emailed me about purses after that and she also purchased one that I had on hand.  I love it when I get to personally talk/email with my customers!  Thanks so much ladies!


I used felt for the letters, hat and bird to machine straight stitch applique on after the quilting was done.

Linking with Let's Bee Social

Tuesday, July 14, 2015

Ta da-it's Tuesday!!

It's only Tuesday and I have a finish and it is on my Q3 list for 2015 FAL. Oh how wonderdful it feels to finish something so early in the quarter!! 

My question to all of you is-Do you recognize this pattern if so please, please tell me as I truly want to give credit to the oirginal designer.  I pieced it over the winter and now have no recollection what so ever as to whose it is.  I don't know if it is an single paper pattern, in a magazine, something I saw online or where-it is so frustrating!

Edit--My fellow blogging friend Jasmine identified the pattern for me-thanks Jasmine!!  The pattern can be found at Melissa Corry's tutorials. I used the 32" block to make this wall hanging. This makes me so happy to have discovered who designed the original block.


I had lots of fun deciding how to quilt it. When I put it on my longarm I only knew how I wanted to quilt the star.  The idea for the star points came from Sandra-thanks Sandra!!  For the star center I have used this Angela Walters design before and really like it.

From there I just stood back and saw I needed to accent the beige behind the star to make it pop. So easy peasy straight lines and wishbones. However, on the longarm going on a diagonal for the free motion wishbones wasn't all that easy, LOL But I got the job done :-)

Then I knew I wanted to repeat in some form the star points in the black triangles, so I used another Angela Walters idea. The diamond shapes received a quick freehand pointy elongated swirl, which doesn't show up much.  Then I stood back and I could see the hexagon shape that the black triangles were forming.  So out came the wishbones and straight lines to accent that feature. And well that presented a problem of what to do in the corner sections that were left!  So after a little more thought, something simple like straight lines seemed right to finish it up.  I think I achieved the over all balance of keeping the quilting at the same density all through the wall hanging. 

I used Glide color Leather throughout the top and SoFine in the bottom with Hobbs 80/20 batting. And finished it up with a solid black binding.

Linking with Adrianne at On the Windy Side at the end of the quarter. But for this week linking with FreeMotion by the River and Let's Bee Social-check out their links on my left side bar!